ECE527 Project - Assembly Line
A Project By Yiming Zhang, Yijun Lu, and Ang Chen.
Demonstration Video
Introduction
This project involved the creation of a simulated cyclic assembly line designed to autonomously sort colored wooden balls. The system was engineered with a focus on integration, comprising an upward conveyor belt, a downward track, and a servo-actuated clamp, working in a continuous loop, with a Raspberry Pi Camera to detect the color of the balls and a servo-actuated arm to sort them. The project saw the successful installation of critical packages on a Raspberry Pi, development of a color detection algorithm, and the implementation of a user interface on a PiTFT for real-time control over the conveyor belt speed and color selection. Throughout the project, we faced and overcame challenges such as the installation of hardware components like the clamp and track and the synchronization of the servo and motor. We also developed software to process sensor signals and control the track selector servo. The final objective was to demonstrate a fully functioning assembly line that could sort the balls by color, as adjusted by the user via the PiTFT interface.
Project Objective
The objective of this project is to design and simulate a cyclic assembly line capable of sorting wooden balls by color. Utilizing a combination of an upward conveyor belt, a downward gravity track, and a servo-actuated clamp, the system will identify and segregate balls using a Raspberry Pi Camera and a servo-actuated arm. The process will be controlled through a GUI on a PiTFT, allowing for adjustable conveyor speed and clamp speed, and color selection to efficiently manage the sorting cycle.
Design
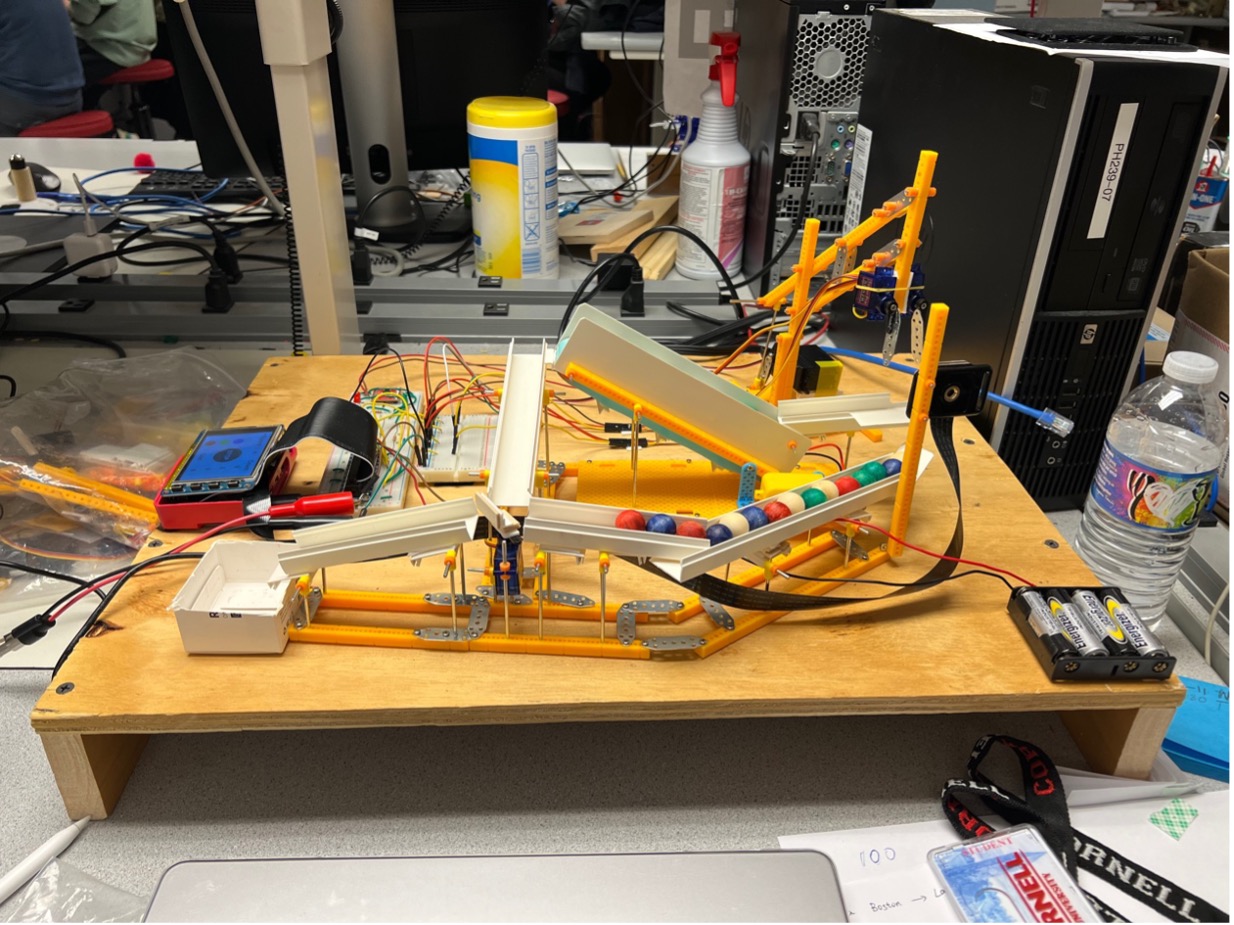
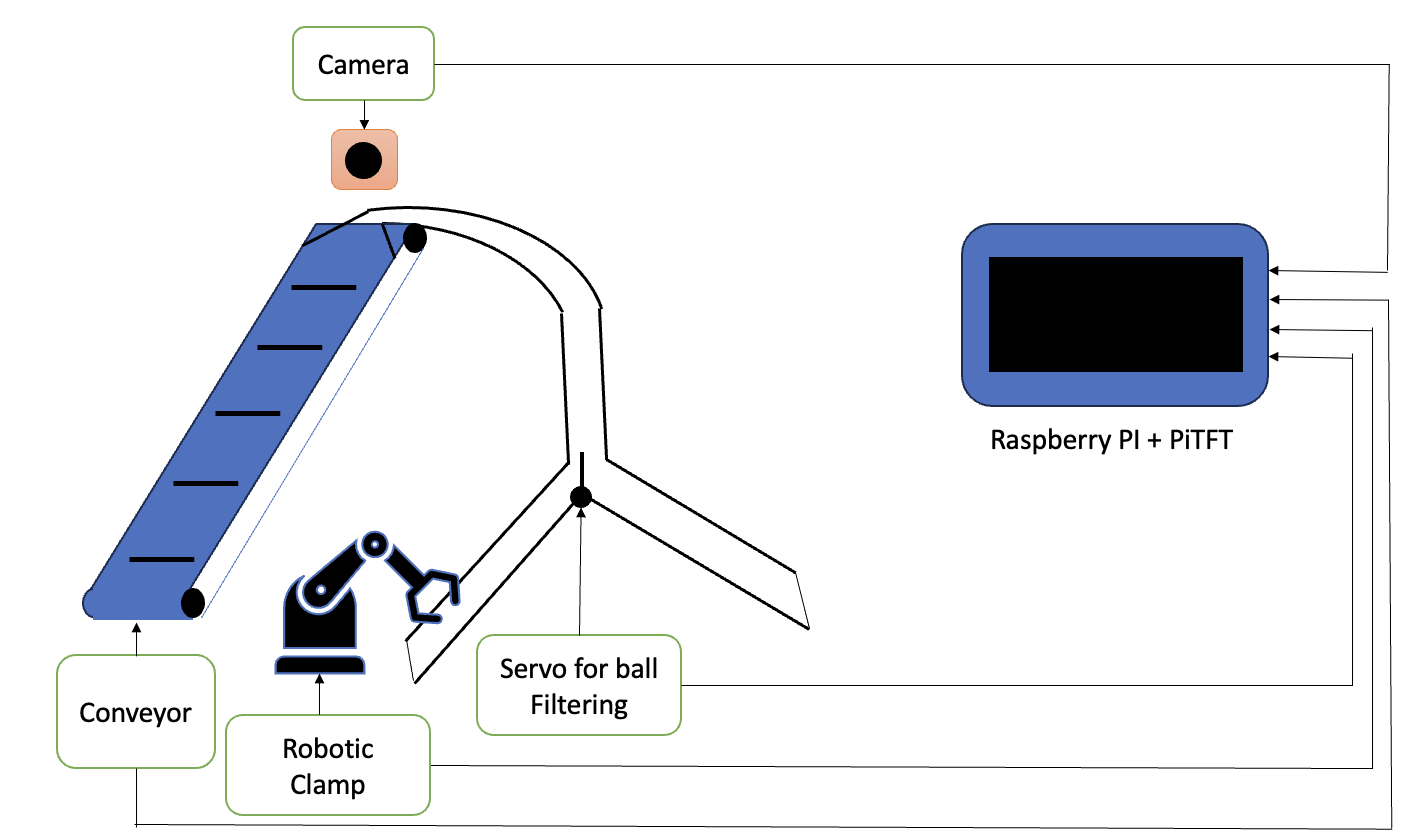
The project's design phase involved simulating a cyclic assembly line capable of sorting colored wooden balls. The design incorporated three main mechanical components: an upward conveyor belt, a downward track, and a servo-actuated clamp, creating a continuous loop. A Raspberry Pi Camera and a servo with an arm were employed to identify and sort the balls based on color, with the system's operations managed through a GUI on PiTFT. The goal was to achieve correct functioning of the conveyor belt, continuous travel of the balls, accurate color detection by a Raspberry Pi Camera, and precise adjustment of the track selector servo by the Raspberry Pi. Design steps involved creating a user interface in Python to control and monitor the cyclic assembly line's operations. This interface allowed users to adjust conveyor and clamp speed, sort wooden balls by color, pause and resume the program, quite the program, and shut down the Raspebrry Pi. Various hardware and software elements were integrated, including the Raspberry Pi and PiTFT as the central control units, the motor-driven conveyor belt, a cyclic track, a Raspberry Pi Camera, a servo-actuated clamp, and the track selector servo.
The material assembly was segmented into three parts: the conveyor belt, the clamp, and the track, along with their integration with the Raspberry Pi and Raspberry Pi Camera. The clamp assembly required innovation to handle the wooden balls’ round shape, leading to the use of two servos on the beam to control the clamp's movement, synchronized with the motor's frequency.
Finite State Machine for the robotic clamp
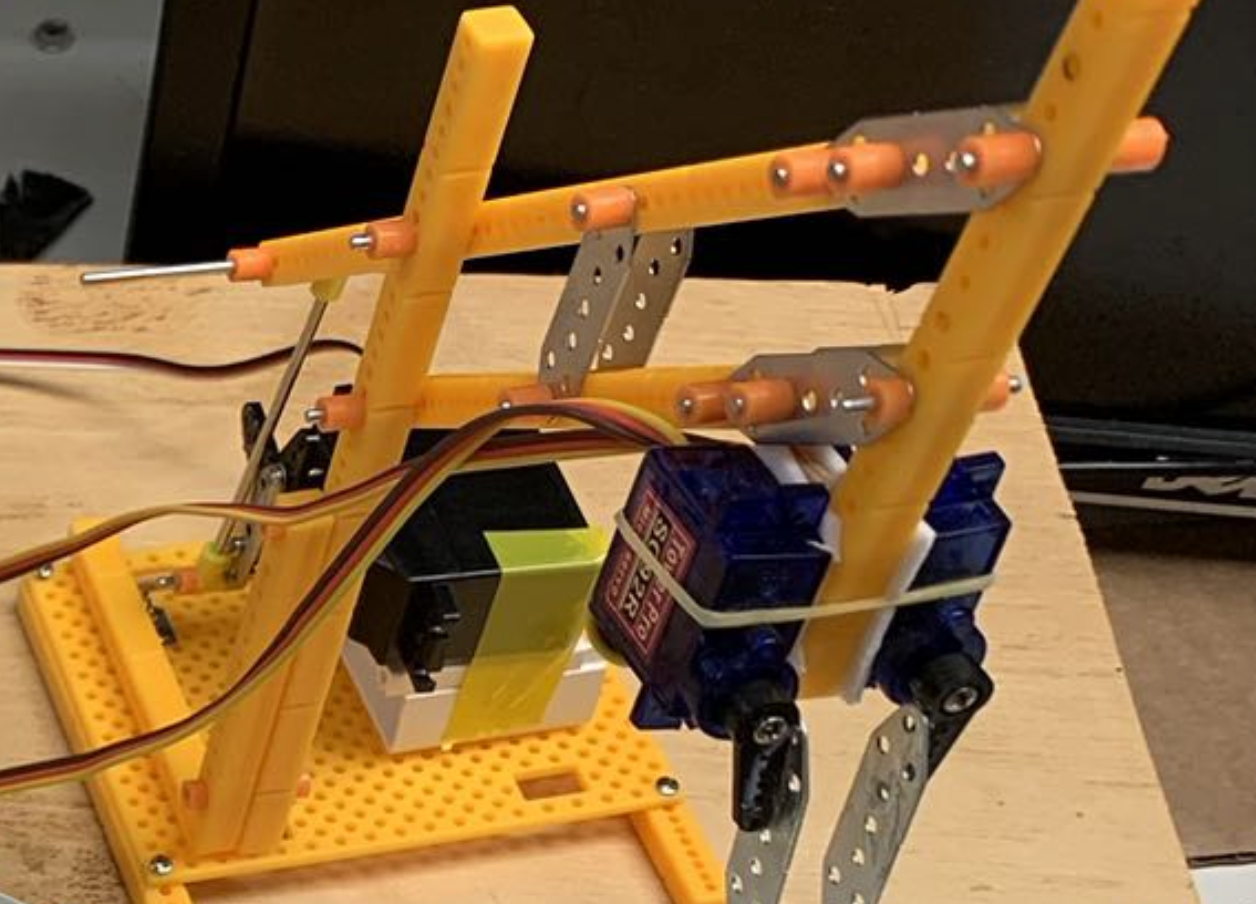
For the design of the robotic clamp, we utilized three servos to control the robotic clamp. As shown above, the black servo wass used to lift the claw up with a transmission structure. The two blue servos were used to control the clamps so that they could grab the balls tightly. This robotic clamp operated as a finite state machine. There are four states for the clamp: 1. Lift up the clamp, release clip; 2. Lay down the clamp, release clip; 3. Lay down the clamp, tight clip; 4. Lift up the clamp, tight clip. These four states are performed sequentially and circularly.
Color Detection for the Pi Camera

For the color detection for balls with different color, we utilized the opencv package to implement the color classification algorithm. We took photos by the Pi Camera under a carefully-chosen frequency based on the fixed frequency of the robotic clamp and the conveyor belt in order to achieve synchronization. Then we transformed the image from RGB to HSV since the HSV values for different colors have larger distance than RGB images. Next, we allocated HSV range for different colors and create a mask for each pixel with its HSV value lying in the specific range. The last step wass to compare the area of each mask with respect to each color and make judgement for the target balll. A detection sample is shown above.
Testing
Throughout the project, we encountered several challenges that were systematically addressed. The clamp mechanism, which required precise control to handle spherical objects, was one such challenge. The installation of two servos to control the clamp's grip was a successful solution, allowing it to stably catch and release the wooden balls. We also adjusted the sensor and track selector. OpenCV installation posed a significant challenge, which was resolved by creating a virtual environment to avoid system issues. We also tested two algorithms for color detection. The RGB range filtering method was chosen for its efficiency over the more accurate but slower contour method.
Result
Upon the completion of the project, we evaluated the performance of the cyclic assembly line against our predefined objectives. The results were promising and, in many respects, met the initial goals set forth.
Firstly, the conveyor belt system and the clamp system were successfully assembled and tested. They demonstrated the capability to lift wooden balls from a lower position to a higher plane consistently, without any malfunctions or interruptions. This was a fundamental requirement for the automated cycle to function, and its successful operation was crucial to the rest of the assembly line's performance.
Secondly, the round-trip travel of the wooden balls was smooth and continuous. The design of the cyclic track, which connected the end and head of the conveyor belt, allowed for gravity-driven movement of the balls, ensuring they could re-enter the conveyor for a seamless loop. In terms of color detection, the Raspberry Pi Camera accurately identified the color of the wooden balls. The signal was effectively communicated to the Raspberry Pi, which in turn correctly adjusted the direction of the track selector servo as per the project's software algorithms. The sensor's ability to quickly and accurately detect color was critical for the sorting process and was achieved through the selection of the RGB range filtering method for its speed and reliability.
The project's software, which was crucial for the UI interaction on the PiTFT, allowed users to adjust conveyor and clamp speed, sort wooden balls by color, pause and resume the program, quite the program, and shut down the Raspebrry Pi. This user interface was successfully implemented and tested for its responsiveness and user-friendliness.
Towards the end of the project, all components were integrated to form a complete cyclic assembly line. The final demo proved that the system functioned as expected, with the capacity to filter the wooden balls by color and adjust operational parameters via the UI. While the project was slightly behind schedule due to delivery delays, all planned objectives were met successfully. The design and testing phases ensured that each component of the assembly line worked in harmony with the others, resulting in a successful demonstration of the project's capabilities.
Conclusions
In conclusion, our project successfully achieved a functional cyclic assembly line for sorting colored wooden balls. We realized that some initial designs, such as the clamp structure, did not work as planned and required re-engineering. We discovered limitations with software responsiveness and hardware precision but overcame these through iterative testing and refinement. Although we encountered challenges, such as delays in component delivery and issues with OpenCV installation, these were addressed effectively, and did not prevent us from meeting our core objectives.
Future Work
For future work, exploring the integration of a more advanced AI-based color detection system could significantly enhance the assembly line's efficiency. Additional time would allow for the implementation of machine learning algorithms that can learn from the assembly process and make real-time adjustments to improve sorting accuracy. Moreover, expanding the system to handle a wider variety of objects beyond wooden balls could broaden its applicability. Lastly, optimizing the mechanical design for scalability and exploring energy-saving measures would be key areas of focus to enhance the system's sustainability and potential for larger-scale deployment.
Work Distribution
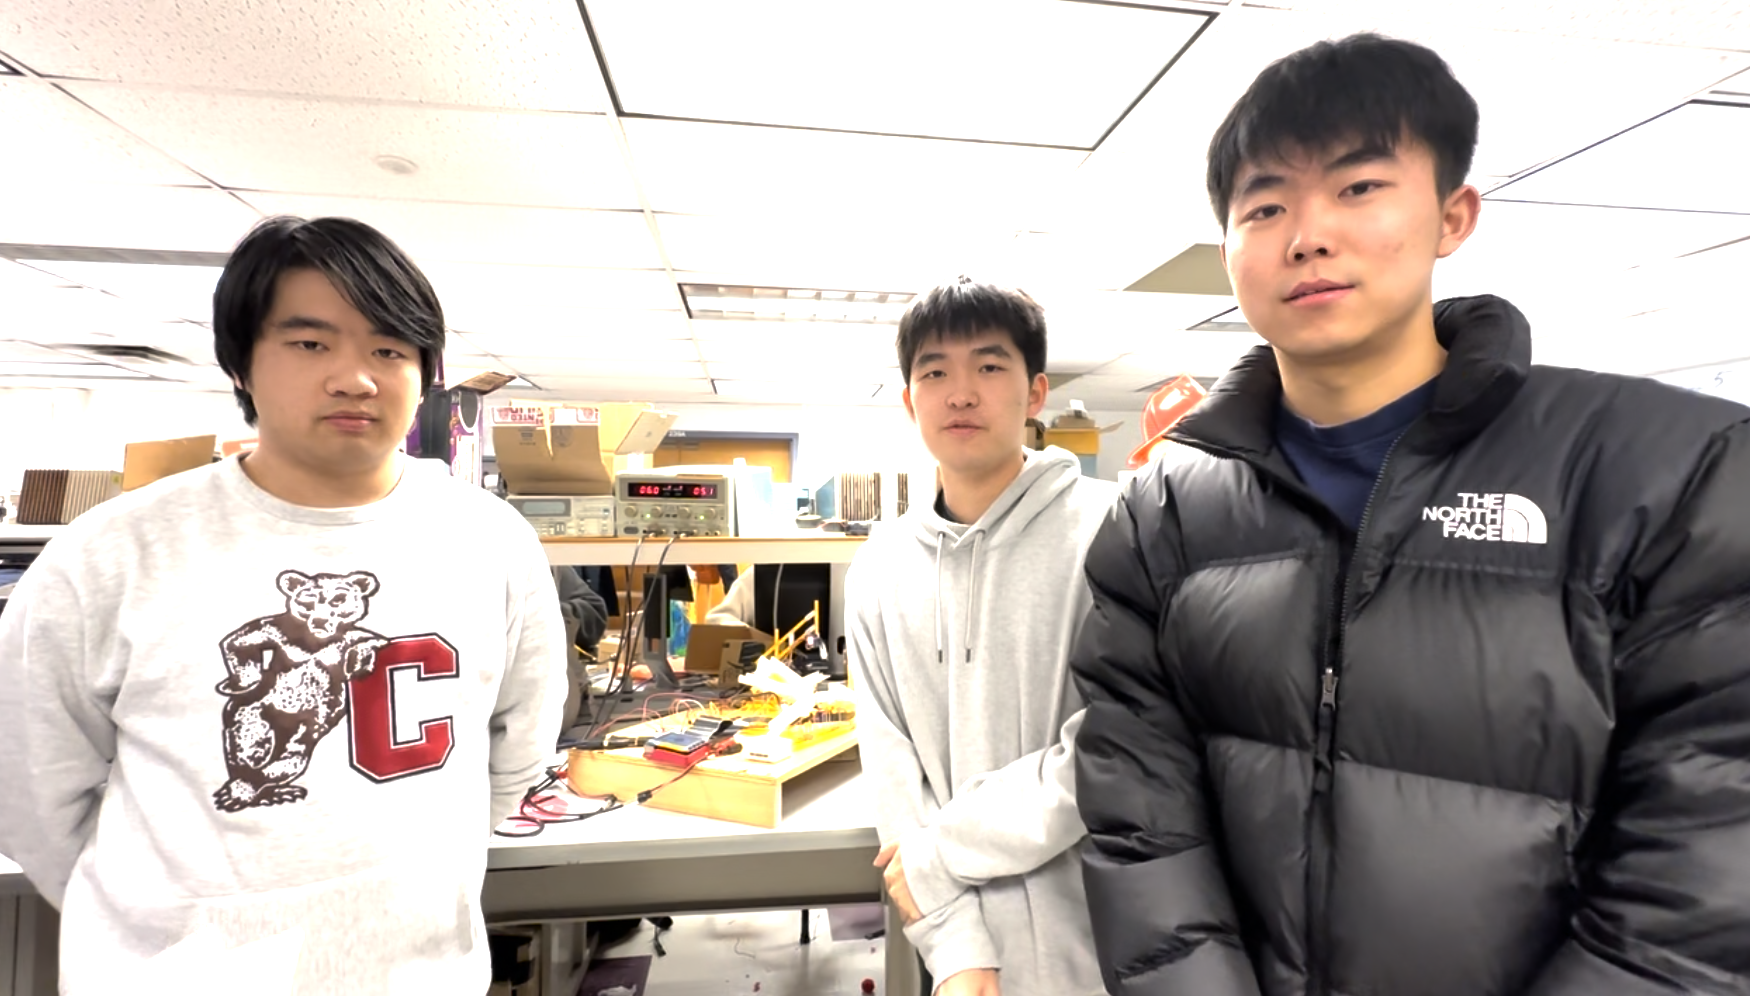
Project group picture

Yiming Zhang
yz2926@cornell.edu
Implemented the overall software architecture for servo control and object detection. Built the clamp to grab the ball.

Yijun Lu
yl3737@cornell.edu
Implemented the UI for PiTFT. Built the conveyor belt and track.

Ang Chen
ac2839@cornell.edu
Built the conveyor belt and track. Tested the whole system.
Parts List
- 1 Raspberry Pi - Provided in lab
- 1 Raspberry Pi Camera - Provided in lab - $10
- 3 Standard Micro Servos - Provided in lab - $20
- 1 Large Micro Servo - Provided in lab - $20
- Building Toolbox (For conveyor and track) - $40
- Wooden Balls - $5
Total: $95
References
PiCamera DocumentTower Pro Servo Datasheet
Bootstrap
Pigpio Library
R-Pi GPIO Document
OpenCV Library
Code Appendix
main.py
import pygame
import sys
import os
from pygame.locals import * # for event MOUSE variables
import time
import RPi.GPIO as GPIO
import threading
import pigpio
import cv2
import sys
from picamera import PiCamera
import numpy as np
import queue
from threading import Thread
from util import *
import subprocess

os.putenv('SDL_VIDEODRIVER', 'fbcon') # Display on piTFT
os.putenv('SDL_FBDEV', '/dev/fb1')
os.putenv('SDL_MOUSEDRV', 'TSLIB') # Track mouse clicks on piTFT
os.putenv('SDL_MOUSEDEV', '/dev/input/touchscreen')

pygame.init()

# Initialize Pygame
# Constants
FPS = 60
BLACK = (0, 0, 0)
GREY = (128, 128, 128)
WHITE = (255, 255, 255)
RED = (255, 0, 0)
GREEN = (0, 255, 0)
BLUE = (0, 0, 255)

window_width = 320
window_height = 240

# Set up the screen
pygame.mouse.set_visible(False)

screen = pygame.display.set_mode((320,240))

pygame.display.set_caption("UI Example")
clock = pygame.time.Clock()

# Fonts
font = pygame.font.Font(None, 36)
font_l = pygame.font.Font(None, 48)
font_s = pygame.font.Font(None, 30)

# GPIO setup
GPIO.setmode(GPIO.BCM)
GPIO.setup(27, GPIO.OUT)
GPIO.setup(22, GPIO.OUT)
GPIO.setup(26, GPIO.OUT)
GPIO.setup(17, GPIO.IN, pull_up_down=GPIO.PUD_UP)

STOPPED = 0
pwm = GPIO.PWM(26, 50)
pwm.start(0) # where dc is the duty cycle (0.0 <= dc <= 100.0)

GPIO.output(27, GPIO.LOW)
GPIO.output(22, GPIO.HIGH)

pi_hw = pigpio.pi()
camera = PiCamera()

# Variables
global speed
global speed2
global duty_cycle
global setting_color
speed, speed2 = 0,0
STOPPED = 0
duty_cycle = 0

global running
running = True

global white_count, blue_count, green_count, red_count
white_count, blue_count, green_count, red_count = 0, 0, 0, 0
current_color = WHITE

# Functions
def draw_speed_count_button():
    minus_button = font_l.render("-", True, BLACK)
    plus_button = font_l.render("+", True, BLACK)
    speed_text = font_s.render(f"Conveyor: {speed}", True, BLACK)
    screen.blit(minus_button, (15, 5))
    screen.blit(plus_button, (150, 5))
    screen.blit(speed_text, (35, 15))

    minus_button2 = font_l.render("-", True, BLACK)
    plus_button2 = font_l.render("+", True, BLACK)
    speed_text2 = font_s.render(f"clamp: {speed2}", True, BLACK)

    screen.blit(minus_button2, (200, 5))
    screen.blit(plus_button2, (290, 5))
    screen.blit(speed_text2, (220, 15))

def draw_quit_sign():
    # count_text = font.render("Count", True, BLACK)
    quit_text = font.render("Quit", True, BLACK)
    # screen.blit(count_text, (210, 12))
    screen.blit(quit_text, (135,200))

def draw_color_buttons():
    pygame.draw.circle(screen, WHITE, (60, 60), 20)
    pygame.draw.circle(screen, BLUE, (60, 110), 20)
    pygame.draw.circle(screen, GREEN, (60, 160), 20)
    pygame.draw.circle(screen, RED, (60, 210), 20)

def draw_color_count():
    WHITE_cnt = font.render(f"{white_count}", True, BLACK)
    BLUE_cnt = font.render(f"{blue_count}", True, BLACK)
    GREEN_cnt = font.render(f"{green_count}", True, BLACK)
    RED_cnt = font.render(f"{red_count}", True, BLACK)
    # screen.blit(WHITE_cnt, (245, 50))
    screen.blit(BLUE_cnt, (245, 100))
    screen.blit(GREEN_cnt, (245, 150))
    screen.blit(RED_cnt, (245, 200))

def increase_speed():
    global speed
    speed = min(3,speed+1)

def decrease_speed():
    global speed
    speed = max(0, speed - 1)

def increase_speed2():
    global speed2
    speed2 = min(3, speed2+1)

def decrease_speed2():
    global speed2
    speed2 = max(0, speed2-1)

def set_motor_speed(speed, direction):
    print(duty_cycle)
    if speed == STOPPED:
        print("Motor is stopped")
        duty_cycle = 0
    elif speed == 1:
        print("Motor is running in speed 1")
        duty_cycle = 55
    elif speed == 2:
        print("Motor is running in speed 2")
        duty_cycle = 70
    elif speed == 3:
        print("Motor is running in speed 3")
        duty_cycle = 90
    pwm.ChangeDutyCycle(duty_cycle)

# Game loop
def UIloop():
    global setting_color
    current_color = WHITE

    button_center = (window_width // 2, window_height // 2)
    button_radius = 50
    button_color = BLACK

    text = font.render("STOP", True, WHITE)
    text_rect = text.get_rect()
    text_rect.center = (window_width // 2, window_height // 2)

    global running, duty_cycle, speed, speed2
    prev_speed, prev_speed2 = 0, 0
    screen.blit(text, text_rect)
    while running:
        screen.fill(current_color)
        # Event handling
        for event in pygame.event.get():
            if event.type == pygame.QUIT:
                running = False
                pygame.quit()
                sys.exit()
            elif event.type == pygame.MOUSEBUTTONDOWN:
                if event.button == 1:  # Left mouse button
                    x,y = pygame.mouse.get_pos()
                    print(x,y)
                    if 0 <= x <= 30 and 0 <= y <= 40:
                        decrease_speed()
                    elif 135 <= x <= 165 and 0 <= y <= 40:
                        increase_speed()
                    elif 185 <= x <= 215 and 0 <= y <= 40:
                        decrease_speed2()
                    elif 275 <= x <= 305 and 0 <= y <= 40:
                        increase_speed2()

                    elif 40 <= x <= 80:
                        if 40 <= y <= 80:
                            # current_color = WHITE
                            # setting_color = "other"
                            print("White!")
                        elif 90 <= y <= 130:
                            current_color = BLUE
                            setting_color = "blue"
                            print("Blue!")
                        elif 140 <= y <= 180:
                            current_color = GREEN
                            setting_color = "green"
                            print("Green!")
                        elif 190 <= y <= 230:
                            current_color = RED
                            setting_color = "red"
                            print("Red!")

                    if 130 <= x <= 200 and 185 <= y <= 220:
                        print("Exit!")
                        running = False
                        pygame.quit()
                        # exit()
                        sys.exit()

                    # Check if the mouse click is inside the round button
                    distance = ((x - button_center[0]) ** 2 + (y - button_center[1]) ** 2) ** 0.5
                    if distance <= button_radius:
                        print("Button Clicked!")
                        if button_color == BLACK:
                            prev_speed = speed
                            speed = 0
                            prev_speed2 = speed2
                            speed2 = 0
                            button_color = GREY
                            text = font_s.render("START", True, WHITE)
                        else:
                            speed, speed2 = prev_speed, prev_speed2
                            button_color = BLACK
                            text = font.render("STOP", True, WHITE)

        # Drawing UI elements
        draw_speed_count_button()
        draw_quit_sign()
        draw_color_buttons()
        draw_color_count()

        # Draw the round button
        pygame.draw.circle(screen, button_color, button_center, button_radius)

        # Draw the text
        screen.blit(text, text_rect)

        # Update the display
        pygame.display.flip()
        clock.tick(FPS)

def main():
    global speed, running, duty_cycle, setting_color, white_count, blue_count, green_count, red_count

    pi_hw.set_servo_pulsewidth(5, 1200)
    turn_array = []
    count = 1
    turn_count = 0
    freq = 0.7
    setting_color = "other"

    try:
        # set_motor_speed(100, 0)
        while running:
            print(duty_cycle)
            if speed == STOPPED:
                print("Motor is stopped")
                duty_cycle = 0
            elif speed == 1:
                print("Motor is running in speed 1")
                duty_cycle = 55
            elif speed == 2:
                print("Motor is running in speed 2")
                duty_cycle = 70
            elif speed == 3:
                print("Motor is running in speed 3")
                duty_cycle = 90
            pwm.ChangeDutyCycle(duty_cycle)


            if speed2 == 1:
                print("clamp speed 1")
                freq = 0.7
            elif speed2 == 2:
                print("clamp speed 2")
                freq = 0.5
            elif speed2 == 3:
                print("clamp speed 3")
                freq = 0.35
            # set_motor_speed(duty_cycle, 0)
            # print(speed)
            if count % 5 == 1:
                image_stamp = "/home/pi/project_convyer/image_section/" + str(int(time.time())) + ".jpg"
                camera.start_preview()
                camera.capture(image_stamp)
                camera.stop_preview()
                pi_hw.set_servo_pulsewidth(6, 2200)

                hsv_image = image_segmentation(image_stamp)
                # let_go_flag = calculate_color(hsv_image, image_stamp)
                # turn_array.append(let_go_flag)

                ball_color = color_selection(hsv_image)
                turn_array.append(ball_color)

                # pi_hw.set_servo_pulsewidth(5, 1200)

                if turn_count >= 1:
                    print(turn_array)
                    if turn_array[turn_count] == setting_color and turn_array[turn_count] != "other":
                        # pi_hw.set_servo_pulsewidth(5, 2100)
                        sleep_time = -duty_cycle/50 + 2.5
                        # if setting_color == "other":
                        #     white_count += 1
                        if setting_color == "blue":
                            blue_count += 1
                        elif setting_color == "green":
                            green_count += 1
                        elif setting_color == "red":
                            red_count += 1
                        # print(duty_cycle)
                        # print(sleep_time)

                        process = subprocess.Popen(['python', 'turn_servo.py', str(sleep_time)])

                pi_hw.set_servo_pulsewidth(19, 1480)
                pi_hw.set_servo_pulsewidth(17, 1030)
                time.sleep(freq)

                turn_count += 1
                print(turn_count)

            elif count % 5 == 2:
                pi_hw.set_servo_pulsewidth(6, 950)
                time.sleep(freq)

            elif count % 5 == 3:
                pi_hw.set_servo_pulsewidth(19, 1560)
                pi_hw.set_servo_pulsewidth(17, 930)
                time.sleep(freq)

            elif count % 5 == 4:
                pi_hw.set_servo_pulsewidth(6, 2200)
                time.sleep(freq)

            else:
                pass

            if speed2 != STOPPED:
                print("clamp is stopped")
                freq = 0.7
                count+=1
    except KeyboardInterrupt:
        exit()
    finally:
        pwm.stop()
        GPIO.cleanup()

t1 = Thread(target=UIloop)
t1.daemon=True
t1.start()
if __name__ == "__main__":
    main()

sys.exit()
util.py
import numpy as np
import cv2

red = [255, 0, 0]
green = [0, 255, 0]
blue = [0, 0, 255]

# hsv_red =
def color_selection(hsvFrame):
    print(hsvFrame.shape)
    # area_list = []

    red_lower1 = np.array([0, 120, 70], np.uint8)
    red_upper1 = np.array([10, 255, 255], np.uint8)
    red_lower2 = np.array([170, 120, 70], np.uint8)
    red_upper2 = np.array([180, 255, 255], np.uint8)
    red_mask1 = cv2.inRange(hsvFrame, red_lower1, red_upper1)
    red_mask2 = cv2.inRange(hsvFrame, red_lower2, red_upper2)
    red_mask = red_mask1 + red_mask2

    green_lower = np.array([25, 52, 72], np.uint8)
    green_upper = np.array([102, 255, 255], np.uint8)
    green_mask = cv2.inRange(hsvFrame, green_lower, green_upper)

    blue_lower = np.array([94, 80, 2], np.uint8)
    blue_upper = np.array([120, 255, 255], np.uint8)
    blue_mask = cv2.inRange(hsvFrame, blue_lower, blue_upper)


    area_list = [cv2.countNonZero(red_mask), cv2.countNonZero(blue_mask), cv2.countNonZero(green_mask)]
    print(area_list)

    if area_list[0] == max(area_list) and area_list[0] >= 20000: #red
        return "red"
    elif area_list[1] == max(area_list) and area_list[1] >= 20000: #blue
        return "blue"
    elif area_list[2] == max(area_list) and area_list[2] >= 70000: #green
        return "green"
    else:
        return "other"


def calculate_color(hsv_image, text):

    lower_red = np.array([120, 0, 0])
    upper_red = np.array([255, 100, 100])

    lower_blue= np.array([0, 0, 50])
    upper_blue = np.array([70, 100, 100])

    lower_green = np.array([0, 50, 0])
    upper_green = np.array([100, 255, 45])

    mask_red = cv2.countNonZero(cv2.inRange(hsv_image, lower_red, upper_red))
    mask_blue = cv2.countNonZero(cv2.inRange(hsv_image, lower_blue, upper_blue))
    mask_green = cv2.countNonZero(cv2.inRange(hsv_image, lower_green, upper_green))

    color_list = (mask_red, mask_blue, mask_green)
    avg_rgb =  np.mean(hsv_image, axis=(0, 1))

    # print(avg_rgb[2])
    if avg_rgb[2] >= 70:
        return True
    else:
        return True

def image_segmentation(image_stamp):
    image = cv2.imread(image_stamp)

    print(image.shape)
    bounding_box = cv2.rectangle(image, (500,0), (900,400), (255, 0, 0), 2)
    cv2.imwrite(image_stamp, bounding_box)
    hsv_image = cv2.cvtColor(image, cv2.COLOR_BGR2HSV)
    hsv_image = hsv_image[0:400, 500:900, :]

    return hsv_image

def get_limits(color):
    c = np.uint8([[color]])  # BGR values
    hsvC = cv2.cvtColor(c, cv2.COLOR_BGR2HSV)

    hue = hsvC[0][0][0]  # Get the hue value

    # Handle red hue wrap-around
    if hue >= 165:  # Upper limit for divided red hue
        lowerLimit = np.array([hue - 10, 100, 100], dtype=np.uint8)
        upperLimit = np.array([180, 255, 255], dtype=np.uint8)
    elif hue <= 15:  # Lower limit for divided red hue
        lowerLimit = np.array([0, 100, 100], dtype=np.uint8)
        upperLimit = np.array([hue + 10, 255, 255], dtype=np.uint8)
    else:
        lowerLimit = np.array([hue - 10, 100, 100], dtype=np.uint8)
        upperLimit = np.array([hue + 10, 255, 255], dtype=np.uint8)

    return lowerLimit, upperLimit
shutdown.py
import RPi.GPIO as GPIO
import os
GPIO.setmode(GPIO.BCM)
GPIO.setup(23,GPIO.IN,pull_up_down=GPIO.PUD_UP)
def shutdown(channel):
    os.system("sudo shutdown -h now")
GPIO.add_event_detect(23, GPIO.FALLING, callback=shutdown, bouncetime=300)
try:
    while True:
        pass
except KeyboardInterrupt:
    GPIO.cleanup()
turn_servo.py
import argparse
import time
import time
import RPi.GPIO as GPIO
import threading
import pigpio
import cv2
import sys
from picamera import PiCamera
import numpy as np


def main():
    parser = argparse.ArgumentParser(description='Example Python script with parsed arguments.')

    # Define a string argument
    parser.add_argument('time', type=float, help='A sample input string.')

    # Parse the arguments
    args = parser.parse_args()

    sleep_time = float(args.time)

    if sleep_time > 0:
        time.sleep(sleep_time)
        pi_hw = pigpio.pi()
        pi_hw.set_servo_pulsewidth(5, 2100)

        time.sleep(1.2)
        pi_hw.set_servo_pulsewidth(5, 1200)


if __name__ == "__main__":
    main()